概要
BNB Chain Testnet上に、ERC721をデプロイする手順
環境要件
STEP 1: 初期設定
作業ディレクトリの作成
mkdir bnbchain-contracts
cd bnbchain-contracts
Hardhatをインストール
npm install --save-dev hardhat
or
yarn add --dev hardhat
STEP 2: Hardhatをセットアップ
Hardhatを初期化
Create an empty hardaht.config.jsを選択
888 888 888 888 888
888 888 888 888 888
888 888 888 888 888
8888888888 8888b. 888d888 .d88888 88888b. 8888b. 888888
888 888 "88b 888P" d88" 888 888 "88b "88b 888
888 888 .d888888 888 888 888 888 888 .d888888 888
888 888 888 888 888 Y88b 888 888 888 888 888 Y88b.
888 888 "Y888888 888 "Y88888 888 888 "Y888888 "Y888
👷 Welcome to Hardhat v2.9.9 👷
? What do you want to do? …
Create a JavaScript project
Create a TypeScript project
❯ Create an empty hardhat.config.js
Quit
選択後、以下が出力
✔ What do you want to do? · Create an empty hardhat.config.js
✨ Config file created ✨

Give Hardhat a star on Github if you're enjoying it! 💞✨

     https://github.com/NomicFoundation/hardhat
STEP 3: ERC721を実装
実装に使用するライブラリをインストール
npm install @openzeppelin/contracts
shor
yarn add @openzeppelin/contracts
ディレクトリとファイルを作成
mkdir contracts
touch contracts/RuckNFT.sol
contracts/RuckNFT.sol に以下のコードを追加
// SPDX-License-Identifier: MIT
pragma solidity ^0.8.9;

import "@openzeppelin/contracts/token/ERC721/ERC721.sol";
import "@openzeppelin/contracts/access/Ownable.sol";
import "@openzeppelin/contracts/utils/Counters.sol";

contract RuckNFT is ERC721, Ownable {
    using Counters for Counters.Counter;

    Counters.Counter private _tokenIdCounter;

    constructor() ERC721("RuckNFT", "RNFT") {}

    function safeMint(address to) public onlyOwner {
        uint256 tokenId = _tokenIdCounter.current();
        _tokenIdCounter.increment();
        _safeMint(to, tokenId);
    }
}
STEP4: テストコードを作成
テストに使用するライブラリをインストール
npm install --save-dev @nomicfoundation/hardhat-toolbox @nomicfoundation/hardhat-network-helpers @nomicfoundation/hardhat-chai-matchers @nomiclabs/hardhat-ethers @nomiclabs/hardhat-etherscan chai @types/mocha @typechain/ethers-v5 @typechain/hardhat hardhat-gas-reporter solidity-coverage ts-node typechain typescript
or
yarn add --dev @nomicfoundation/hardhat-toolbox @nomicfoundation/hardhat-network-helpers @nomicfoundation/hardhat-chai-matchers @nomiclabs/hardhat-ethers @nomiclabs/hardhat-etherscan chai @types/mocha @typechain/ethers-v5 @typechain/hardhat hardhat-gas-reporter solidity-coverage ts-node typechain typescript
ディレクトリとファイルを作成
mkdir test
touch test/RuckNFT.js
test/RuckNFT.js に以下のコードを追加
const { loadFixture } = require("@nomicfoundation/hardhat-network-helpers");
const { expect } = require("chai");

describe("RuckNFT",  () => {
  const deployRuckNftFixture = async () => {

    const [owner, otherAccount] = await ethers.getSigners();

    const RuckNFT = await ethers.getContractFactory("RuckNFT");
    const ruckNFT = await RuckNFT.deploy();

    return { ruckNFT, owner, otherAccount };
  }

  describe("safeMint", () => {
    it("OwnerがNFTを発行できる", async () => {
      const { ruckNFT, owner, otherAccount } = await loadFixture(deployRuckNftFixture);

      await ruckNFT.connect(owner).safeMint(otherAccount.address);

      expect(await ruckNFT.ownerOf(0)).to.equal(otherAccount.address);
    });

    it("非オーナーがNFTを発行できない", async () => {
      const { ruckNFT, otherAccount } = await loadFixture(deployRuckNftFixture);

      await expect(ruckNFT.connect(otherAccount).safeMint(otherAccount.address)).to.be.revertedWith("Ownable: caller is not the owner");
    });

    it("連続してNFTを発行すると、Token IDがインクリメントされる", async () => {
      const { ruckNFT, owner, otherAccount } = await loadFixture(deployRuckNftFixture);

      await ruckNFT.connect(owner).safeMint(otherAccount.address);
      await ruckNFT.connect(owner).safeMint(otherAccount.address);

      expect(await ruckNFT.ownerOf(0)).to.equal(otherAccount.address);
      expect(await ruckNFT.ownerOf(1)).to.equal(otherAccount.address);
    });
  });
});
hardaht.config.js を修正
require("@nomicfoundation/hardhat-toolbox"); // 追加

/** @type import('hardhat/config').HardhatUserConfig */
module.exports = {
  solidity: "0.8.18",
};
以下のコマンドでテストを実行
テスト実行後、以下が出力
  RuckNFT
    safeMint
      ✔ OwnerがNFTを発行できる (1212ms)
      ✔ 非オーナーがNFTを発行できない (53ms)
      ✔ 連続してNFTを発行すると、Token IDがインクリメントされる (50ms)

  3 passing (1s)
STEP5: WalletにRPCを追加
以下のサイトから「Add to Wallet」を押下し、WalletにBNB Chain Testnetを追加
※ 既に設定済みの場合はスキップ
STEP6: Faucetから通貨を取得
以下のサイトから自分のWalletを入力して、0.1BNBを取得
※テストネットにデプロイする際のガス代にBNBを使用します。
STEP7: ネットワーク設定
hardaht.config.js を修正
require("@nomicfoundation/hardhat-toolbox");

/** @type import('hardhat/config').HardhatUserConfig */
module.exports = {
  solidity: "0.8.18",
  networks: {
    bnbTestnet: {
      url: "",
      accounts: ['']
    },
  }
};
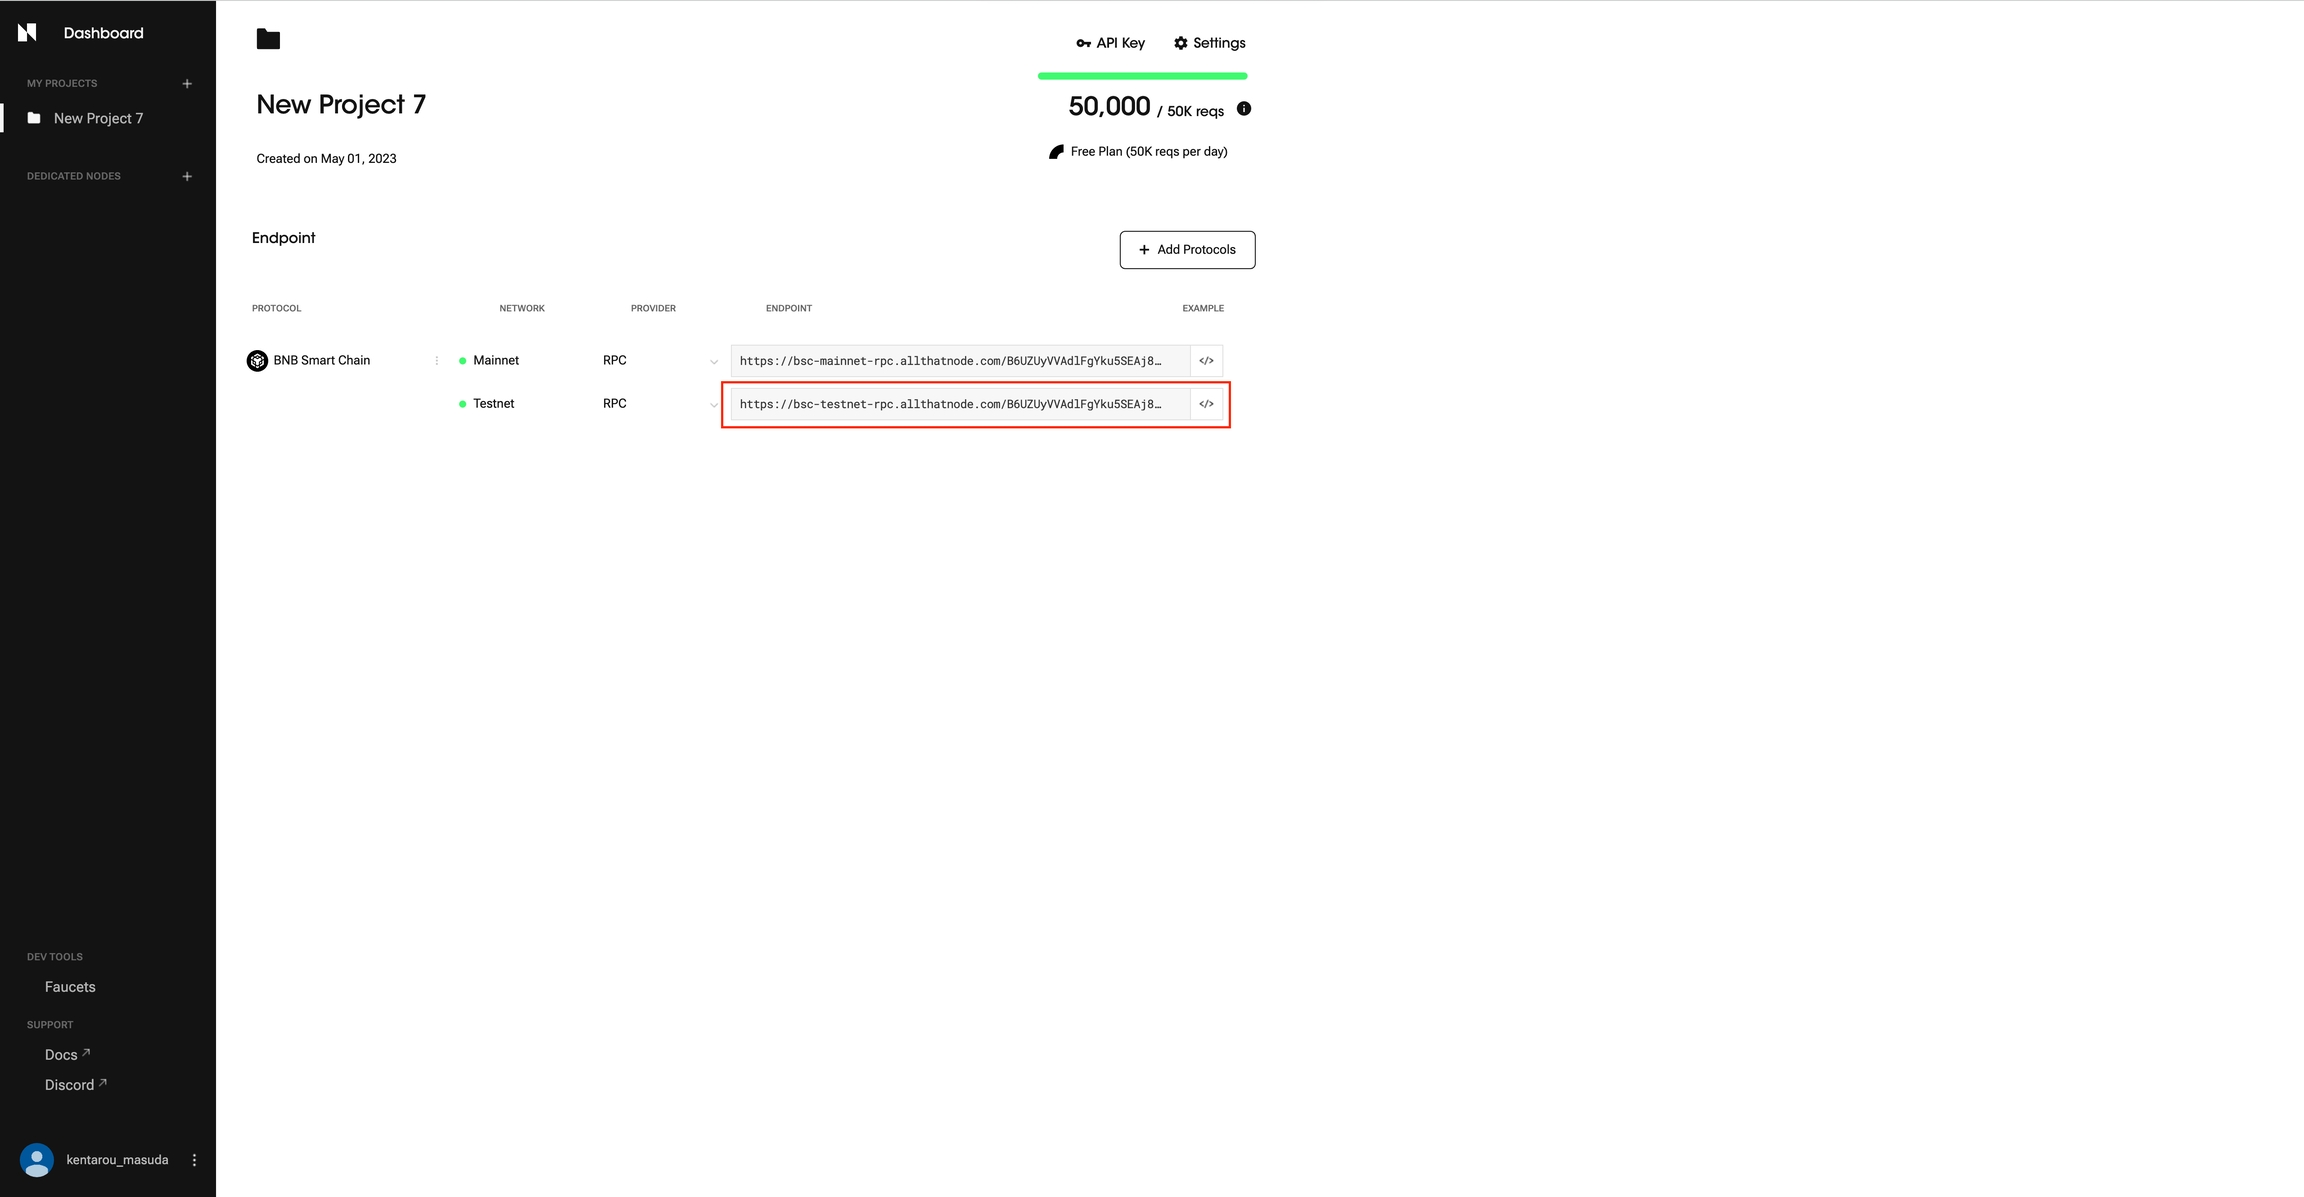
All That Nodeにて、BNB Chain Testnetのエンドポイントを取得
All That Nodeから取得したエンドポイントとWalletの秘密鍵を指定
require("@nomicfoundation/hardhat-toolbox");

/** @type import('hardhat/config').HardhatUserConfig */
module.exports = {
  solidity: "0.8.18",
  networks: {
    bnbTestnet: {
      url: "https://bsc-testnet-rpc.allthatnode.com/xxxxxxxxxxx", // Add: エンドポイント
      accounts: ['xxxxxxxxxxxxxxxxx'] // Add: ウォレットの秘密鍵
    },
  }
};
STEP8: デプロイのスクリプトを作成
ディレクトリとファイルを作成
mkdir scripts
touch scripts/deploy.js
scripts/deploy.js に以下のコードを追加
const hre = require("hardhat");

const main = async () => {
  const RuckNFT = await hre.ethers.getContractFactory("RuckNFT");
  const ruckNFT = await RuckNFT.deploy();

  await ruckNFT.deployed();

  console.log(`Deployed to ${ruckNFT.address}`);
}

main().catch((error) => {
  console.error(error);
  process.exitCode = 1;
});
Javas
STEP9: デプロイ
以下でデプロイを実行
npx hardhat run scripts/deploy.js --network bnbTestnet
デプロイが成功するとコントラクトアドレスが出力
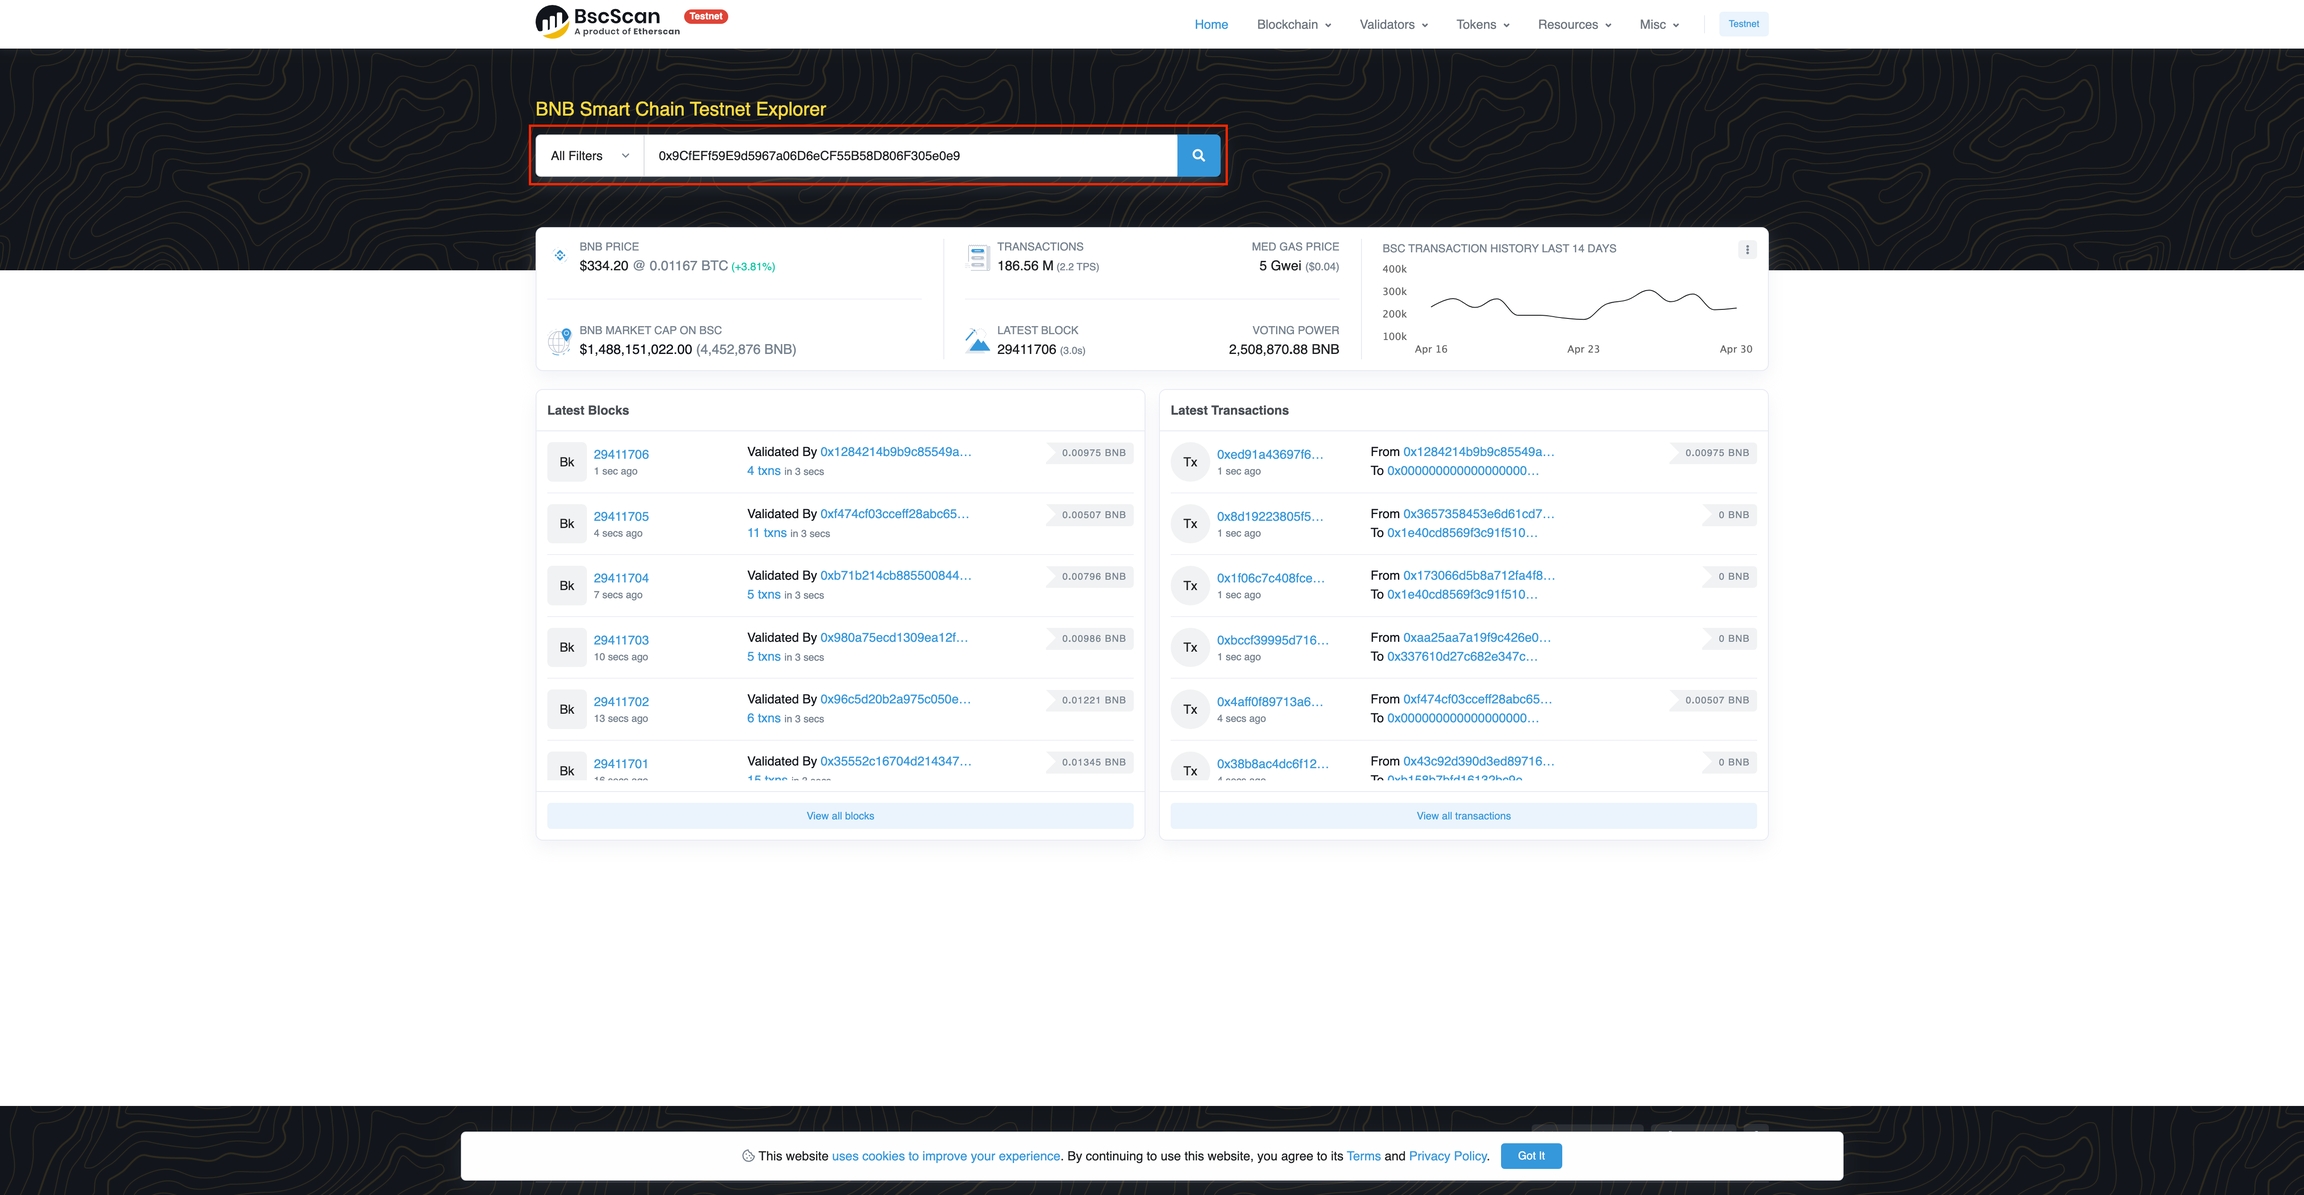
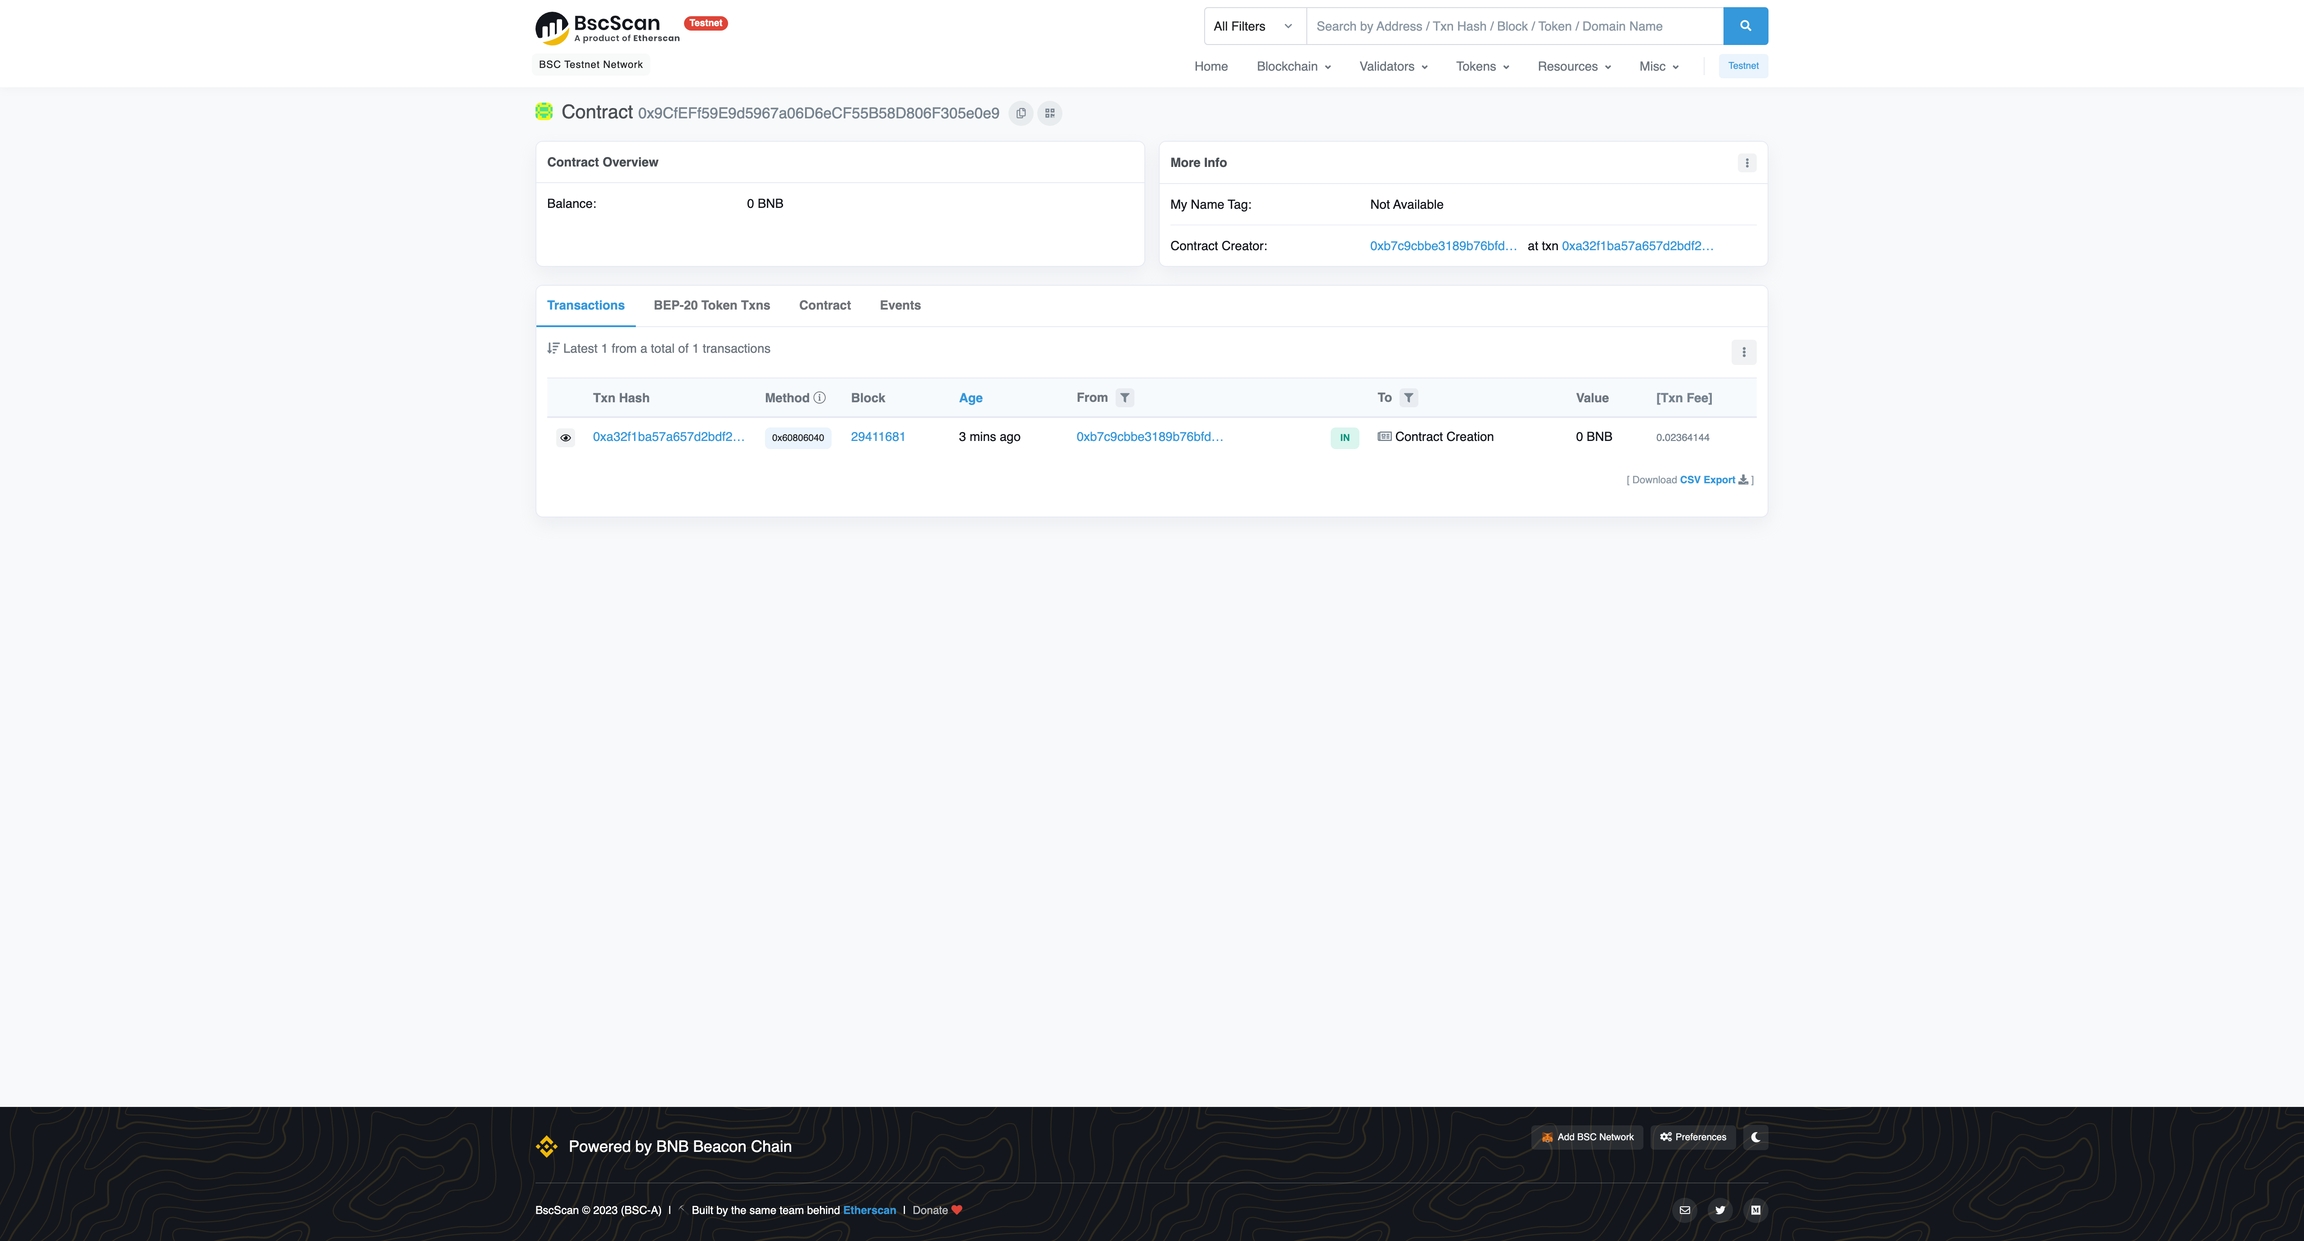
Deployed to 0x9CfEFf59E9d5967a06D6eCF55B58D806F305e0e9
bnbsdcanにアクセス
コントラクトアドレスを検索
完了